AirEFB - OPERATIONS MANUAL
1. SUMMARY
AirEFB implements a Boeing style Electronic Flight Bag for the iPad to be used in conjunction with X-Plane or FS2020 flight simulators in order to make flying easier and more fun.
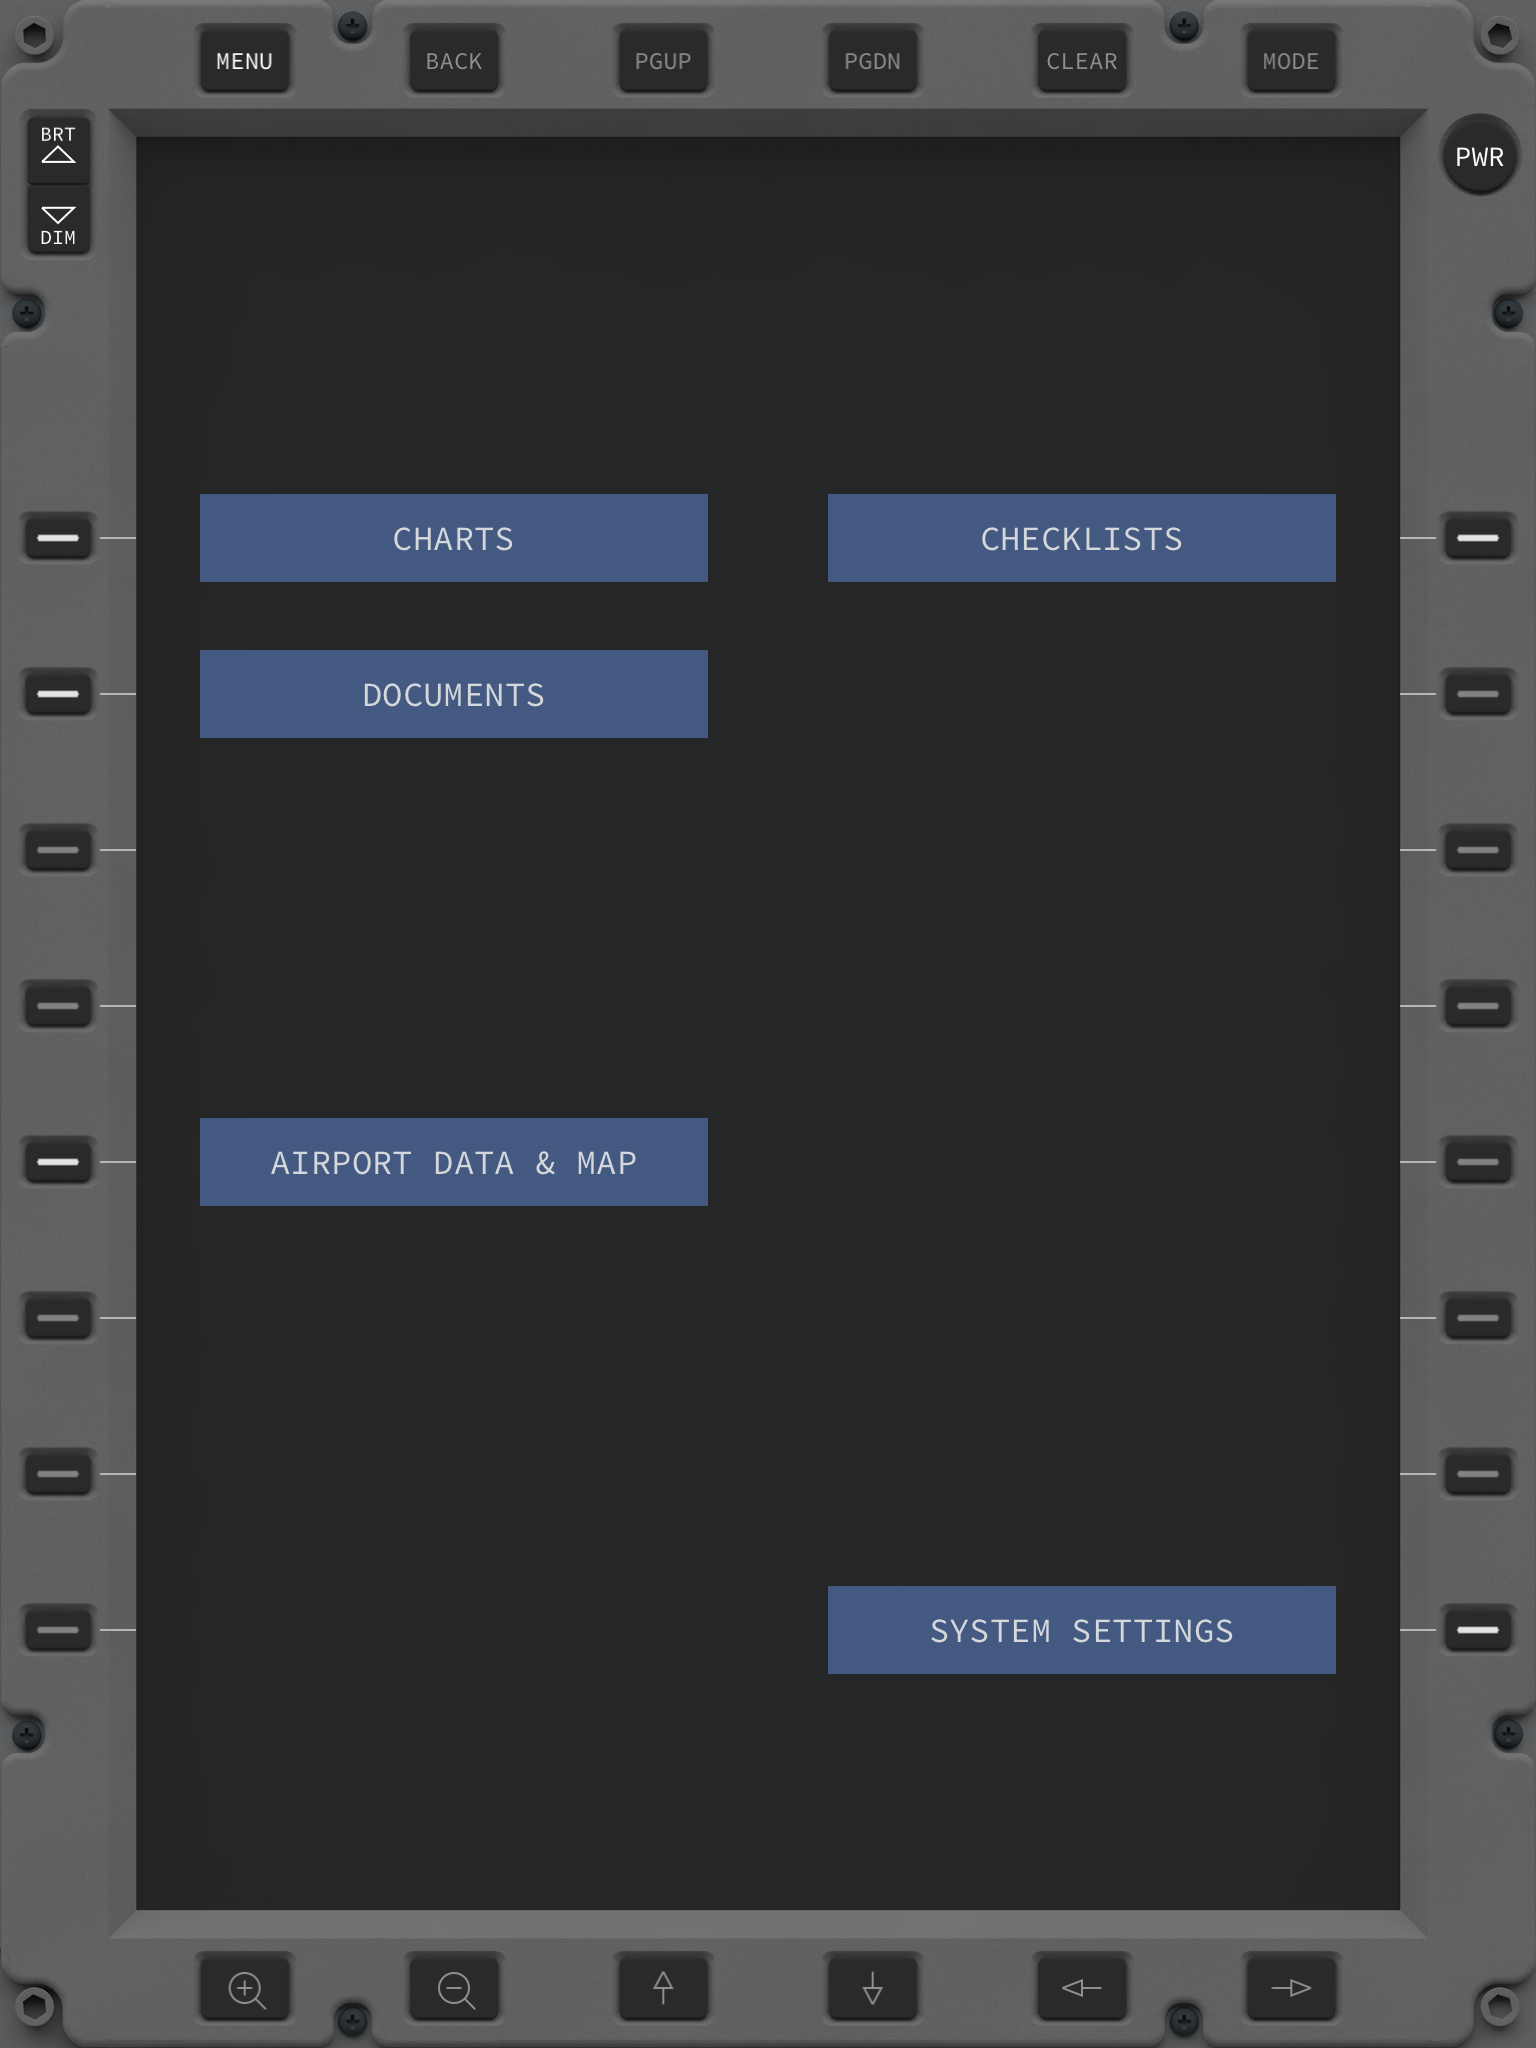
With the aid of a plugin or add-on, AirEFB connects to the simulator and exchanges real time flight data with it. In its current version AirEFB provides 4 distinct levels of funcionality in 4 pages accessible from the main menu: CHARTS, an approach plate / charts browser, CHECKLISTS, a way to create, import and manage plane checklists, DOCUMENTS, a PDF browser for all types of technical plane documents to be carried onboard, and AIRPORT DATA & MAP, an airport TAXI moving map system. In future versions, AirEFB may comprise more pages with added funcionality.
2. HARDWARE AND SOFTWARE REQUIREMENTS
In order to run AirEFB requires an iPad, iPhone or Mac running iOS or macOS.
Simulatorwise AirEFB requires X-Plane 11 or above or Microsoft's Flight Simulator 2020 and a piece of software called the Air Plugin installed in or with each of these in order to make communication possible.
AirEFB can also be used without a simulator, with only the Device Location Services data source which provides the current device's coordinates from the GPS position.
Due to the layout of the simulated EFB, the App only runs in portrait mode.
3. GENERIC CONTROLS
The EFB's generic controls reside on the buttons which are placed around and throughout its frame. In addition to these, various pages also accept touch input in the central area of the screen, whether this is through push-down buttons, text, or gestures (zooming and panning for example).
|
The purpose of the generic buttons around the frame is as follows:
BRT / DIM - These two buttons are displayed on the top/left of the EFB and allow the screen brightness to be increased or decreased. MENU - This button always brings the EFB to its main menu page independently of which page is currently active. BACK - Goes back one level from the current level in the active data page. PGUP / PGDN - For sections that support multiple pages, these two keys allow the user to flow through each of the data pages. CLEAR - Associated with clearing functions, its purpose depends on the active data page (for example in CHECKLISTS it enters clear mode). MODE - Used to activate some sort of mode in a data page, usually to allow for specific configuration to be entered. MAGNIFYING GLASSES - Used to zoom IN and OUT, where available. ARROW KEYS - Used to move up, down, left or right, where applicable. Are also used to allow flowing thorugh data pages (up/down similar to page up and down) or to reveal additional at the same level when this exists (left/right).
|
4. CHARTS
The CHARTS data page is acessible by tapping on its text or via LK1 and brings the user to the charts browser.
|
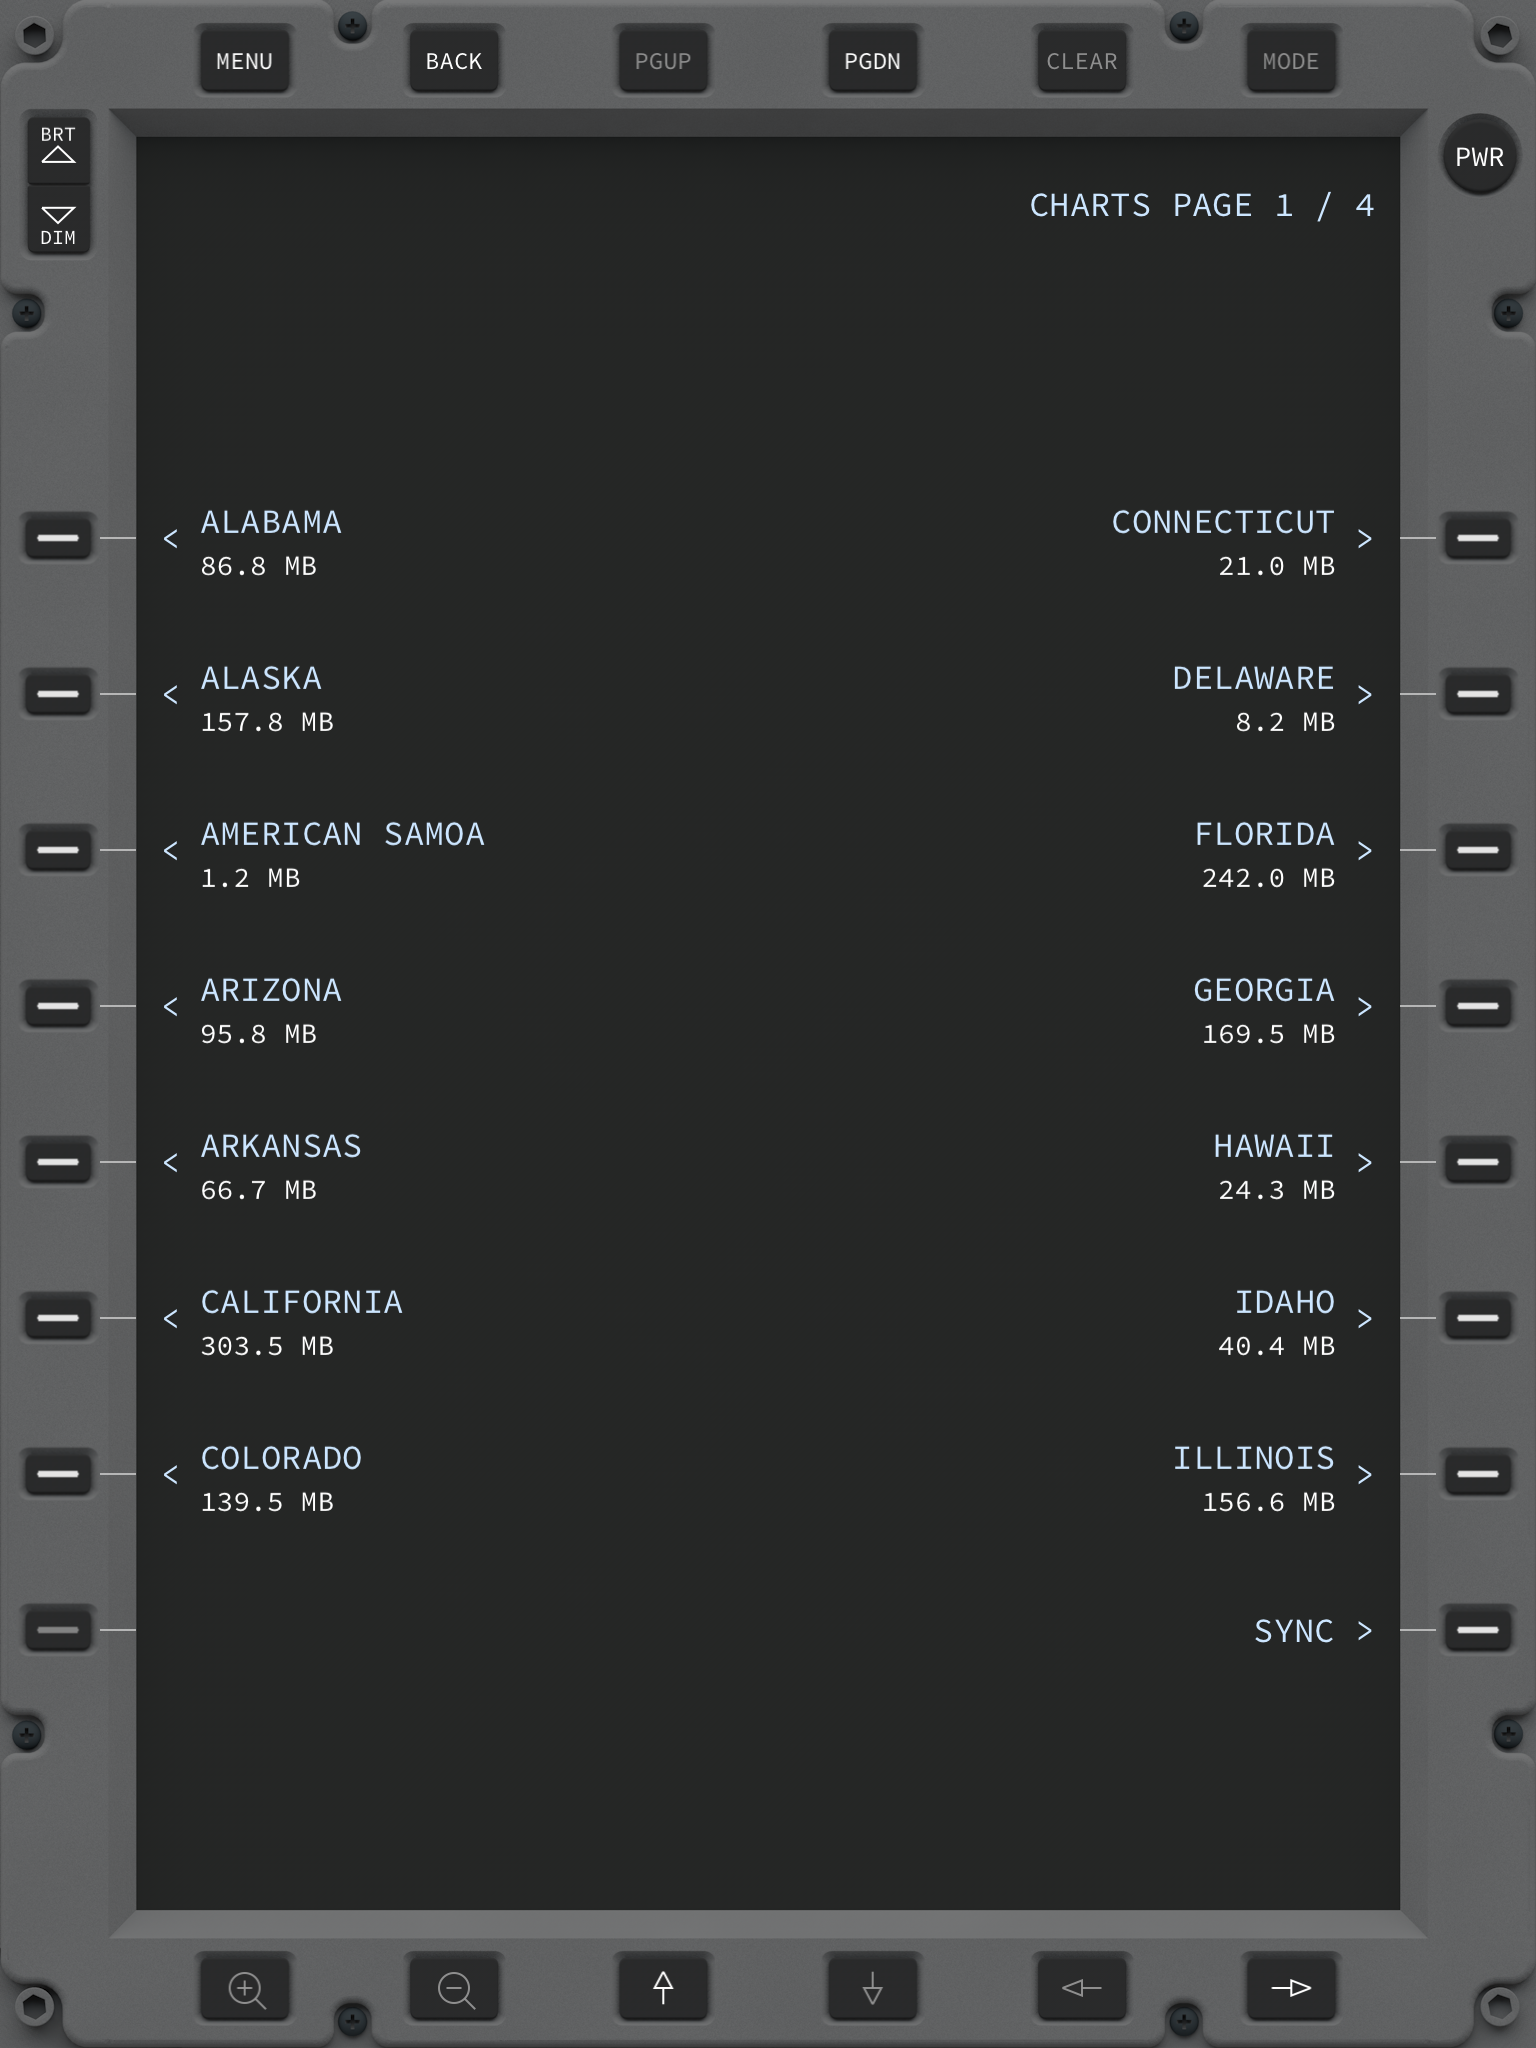
The picture on the left depicts a page in the browser hierarchy; charts are organised in levels and each level contains either additional sub-levels or charts. Either pressing on the corresponding LK or RK or by tapping on its label, the user can select the given chart or sub-folder. For cloud charts (see below) the size of the chart or folder is also displayed in two forms; the first number is the size in the local device and the second number is the size on the cloud (i.e. to be downloaded). If these are the same only one number is displayed. Folder sizes are formed by the sum of the size all charts underneath them. The BACK button and the UP arrow bring the user to one level above. If there are more charts and folders that can be displayed on screen the PG UP / DN and left/right arrows allow different pages with different charts to be selected. The SYNC button allows cloud charts (i.e. those that reside in the cloud) to be downloaded and synchronised to the local device's storage. They can then be used offline without a data connection as they are locally stored. Beware of the sizes as synchronising a large folder can lead to a lot of data being transmitted. When charts are synchronised a new DELETE SYNCED CLOUD FILES button appears allowing those files to be deleted from local storage (thus releasing drive space) from that point downwards. They can however be re-downloaded at any point in time providing they are still in the cloud. |
There are 3 types of charts; Haversine provided default cloud charts such as the FAA charts, user CLOUD CHARTS which a user can upload to their personal Air Account and LOCAL CHARTS
All charts need to be in PDF format; CLOUD charts are shown on all devices that use the same user account, and on both AirTrack and AirEFB apps. Thus they provide a good way to organise one's charts making them device independent and allowing them to be synched whenever needed.
LOCAL CHARTS are charts that are user stored locally on the device and app itself and are not shared beyond it. In order to configure local charts simply create a folder named CHARTS, populate it with folders and sub-folders of its own and with charts in PDF format with the .pdf extension, then copy them to AirEFB using iTunes file sharing. They will then appear next to the cloud charts seamlessly.
|
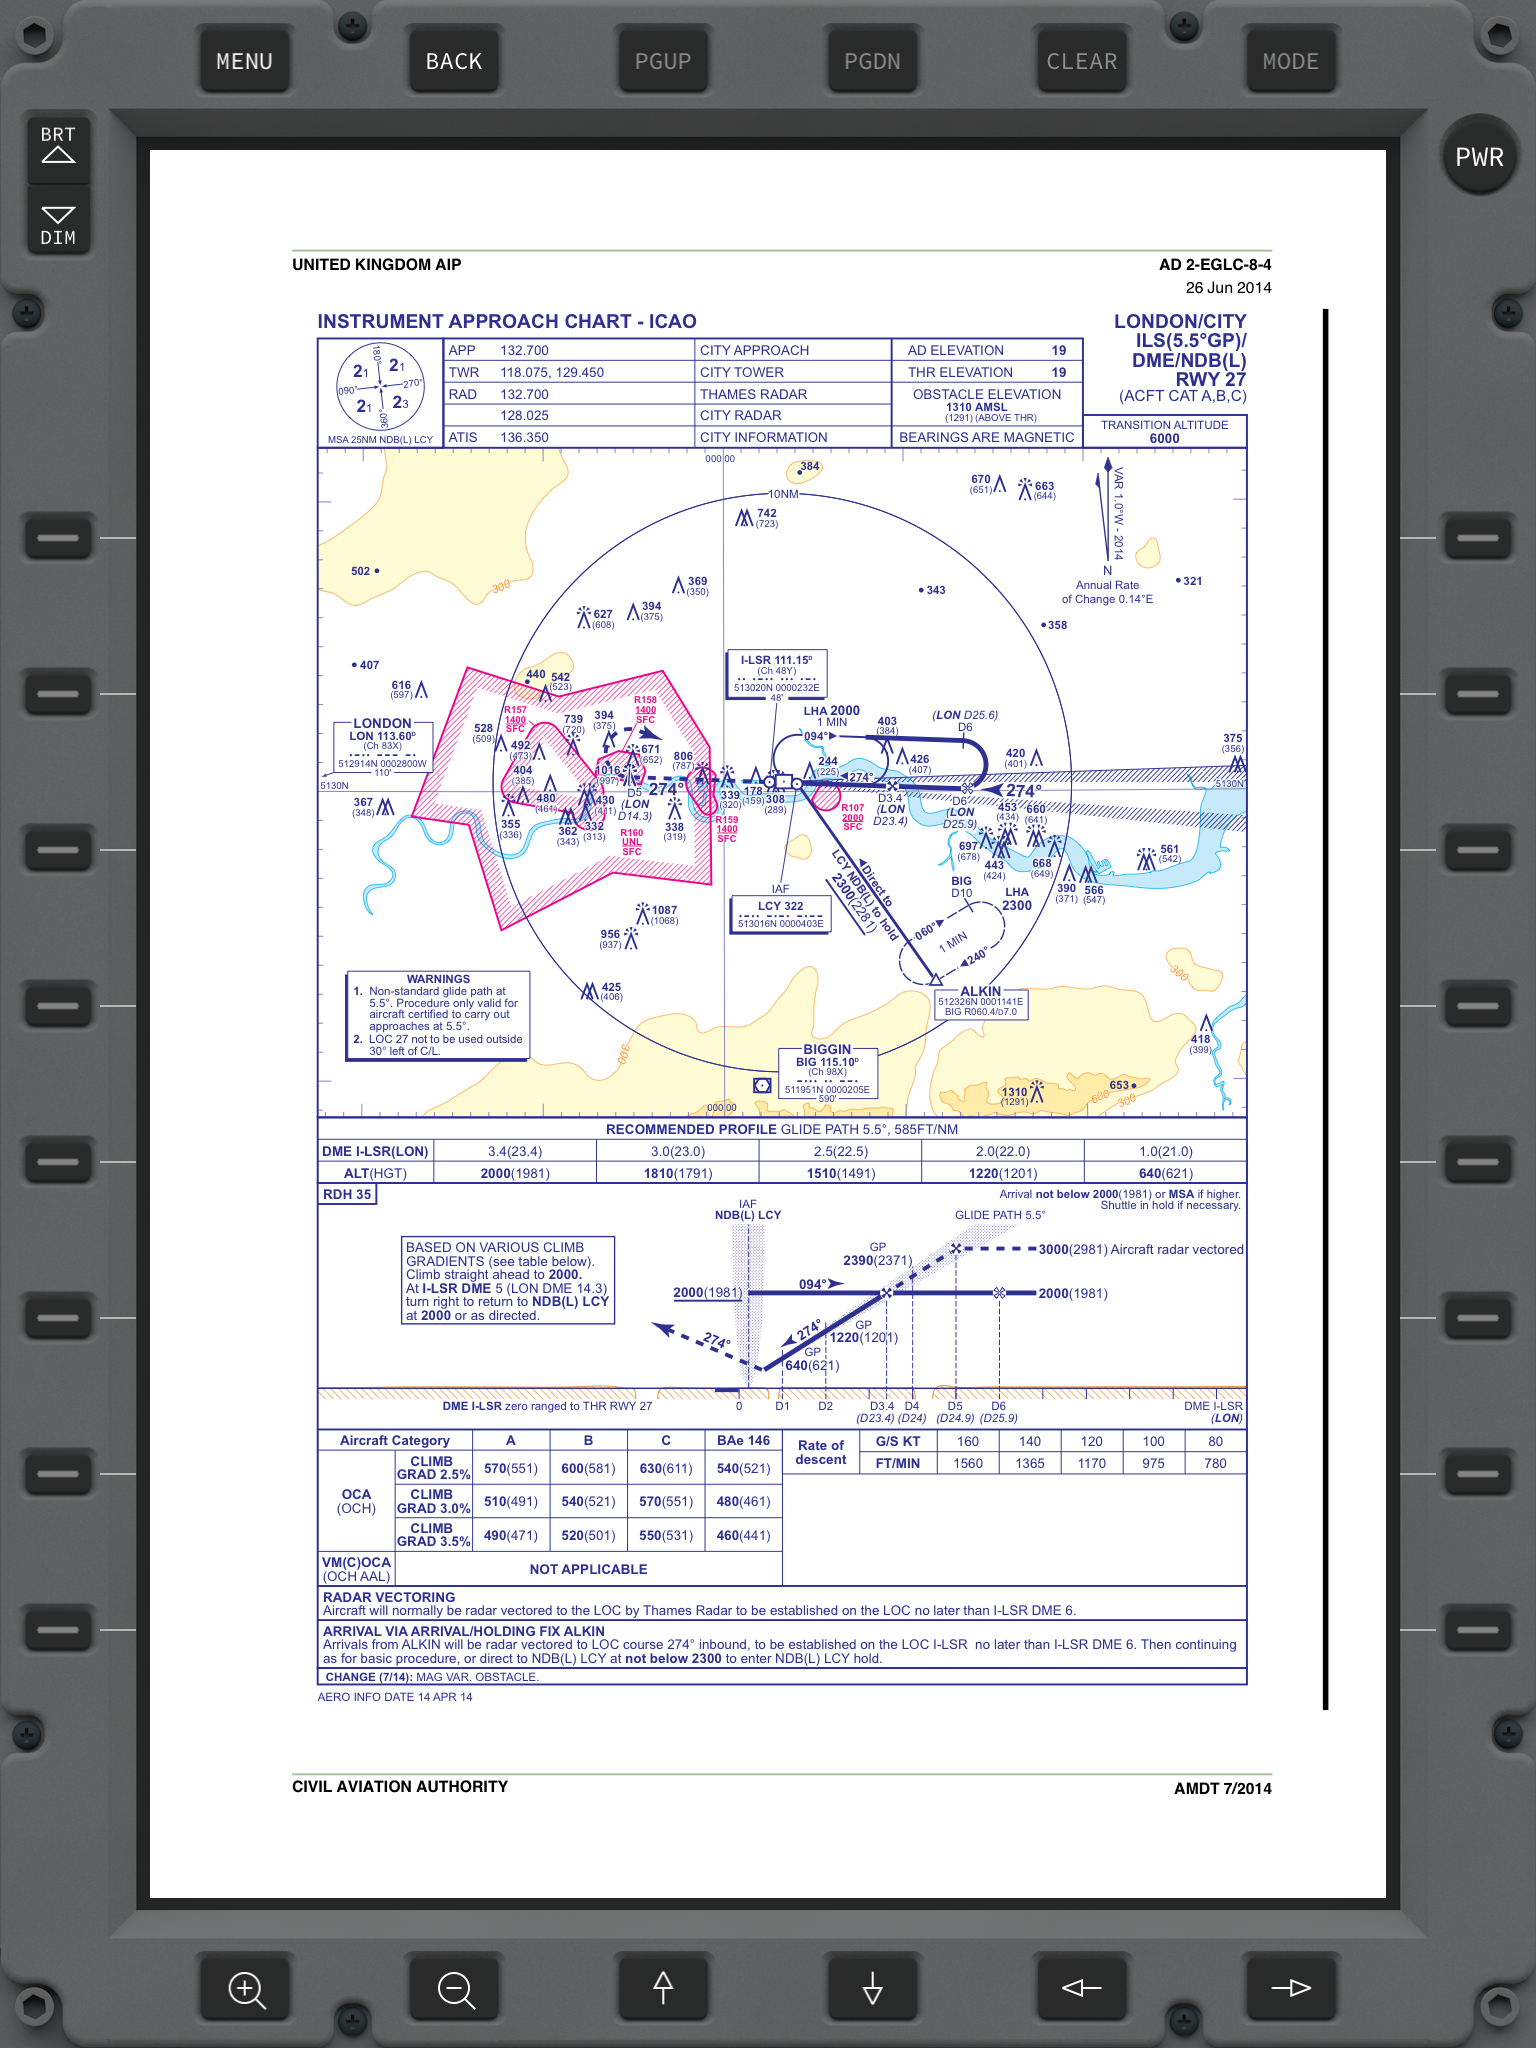
Selecting an actual chart causes it to be downloaded (if it doesn't yet exist in local storage) and opening it. The picture on the left depicts it. If a chart document has multiple pages, using the PG UP / DOWN keys allows different pages to be selected / toggled through. Charts can be zoomed in / out which causes them to be redrawn in high definition (seeing they're vector files). They can also be rotated with a rotation gesture with two fingers. Double tapping on a chart brings it to FULL SCREEN thus effectively using all the screen space of the iPad to display the chart. Double tapping again quickly brings things back to framed / EFB mode. Remeber, once opened, cloud charts stay on the local storage; you'll need to press DELETE SYNCED CLOUD FILES to release their space. |
5. CHECKLISTS
This section of the EFB allows pre-flight and in-flight checklists to be created, parsed and processed.

|
The CHECKLISTS data page allows plane checklists to be stored and processed. Each checklist has a name which appears on its main button and allows it to be selected. Checklists are made of PAGES and each page made of ITEMS that need to be completed. Checklists are imported using the clist format used by the Xchecklist plugin for X-Plane. Similarly to charts, user checklists can be put on the app by creating a folder named CHECKLISTS with files whose name is the checklist name and ending on the .clist extension, and dragging this CHECKLISTS folder to AirEFB using iTunes File Sharing. Alternatively, if the SIM AIRCRAFT CHECKLISTS option is enabled in settings, all planes found in X-Plane that contain a file named clist.txt in their folder will have their checklist automatically appear in AirEFB with the name of the plane's folder as the list name. And last but not least, checklists can be created in the app by selecting the NEW CHECKLIST RK which causes the checklist editor to be entered. The MODE button when pressed on any checklist allows the list to be edited and pages and items to be added or removed to/from it. Clicking MODE again exists the editor. |
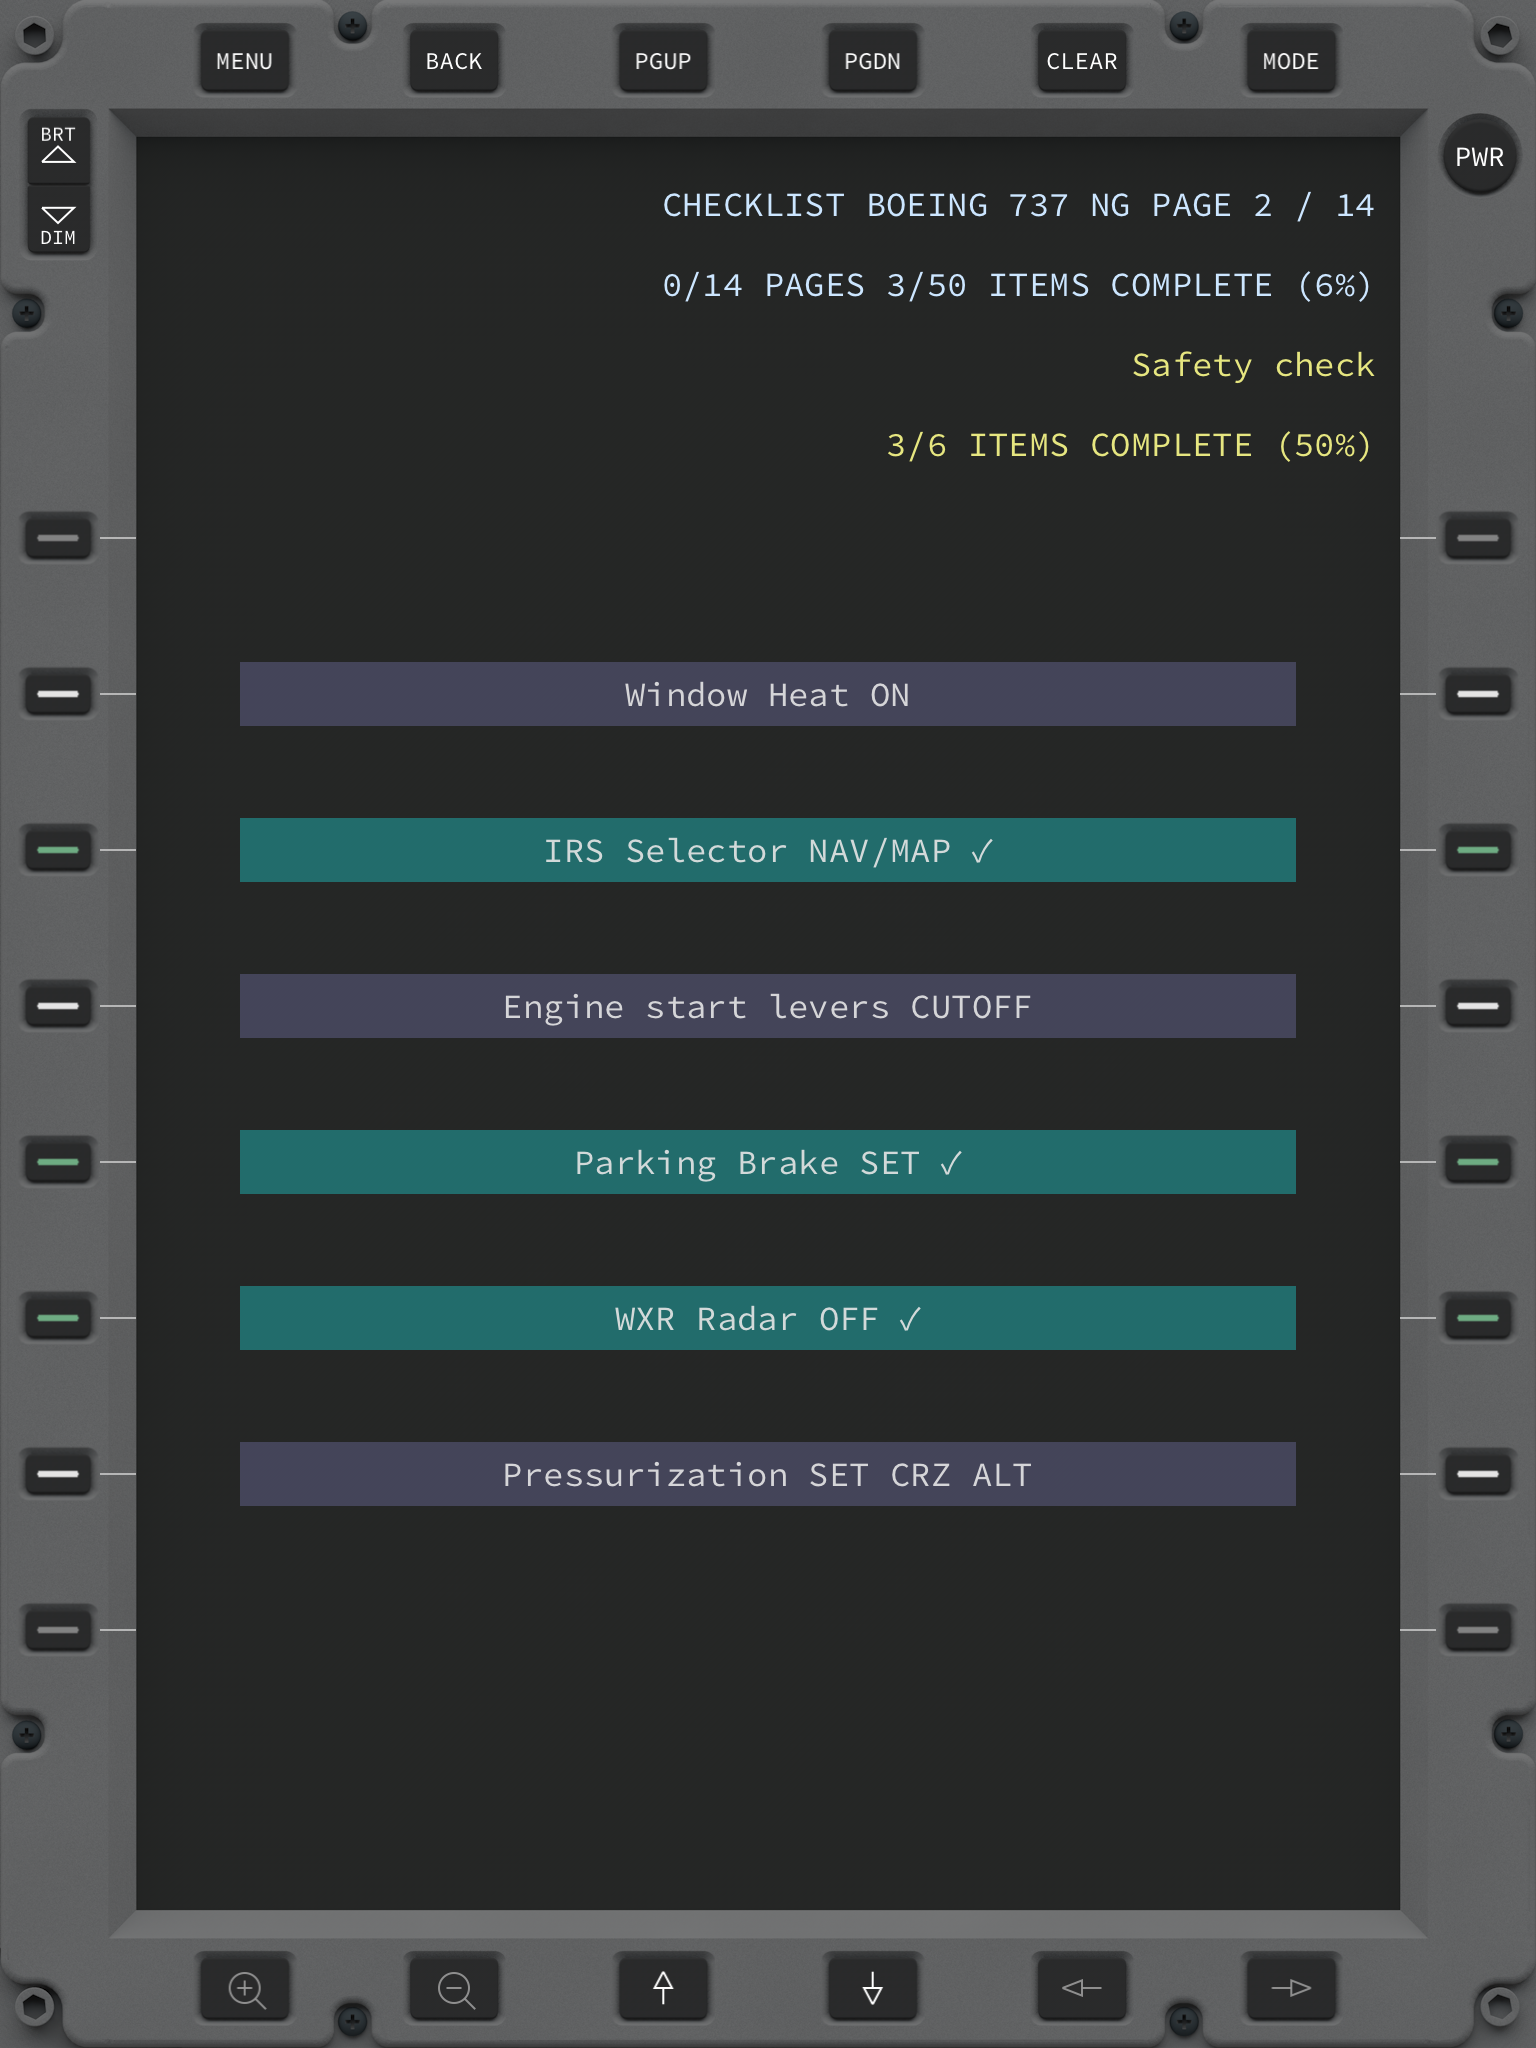
Selecting a checklist opens it; the following picure depicts this:
|
Each ITEM in the checklist is displayed on a single line button. Tapping on it causes it to be marked as completed and turns it green. Tapping again causes it to be marked as pending and brings it back to blue(ish). The purpose is of course to complete all items in the checklist in all pages. The PG UP / DN and UP/DOWN arrow keys allow the user to toggle between pages. If a page has multiple items that don't all fit on screen, the LEFT and RIGHT keys allow these to be displayed and toggled. The progress throughout the checklist is shown on the top of the screen, indicating the number of pages and items completed as well as their overall percentage. The CLEAR key can be used to RESET all items in a checklist or to reset all items on a page. It should be used whenever the process restarts, i.e. at the beginning of every flight. In addition to tapping all the items in the checklist manually, AirEFB provides a feature named CHECKLIST PLANE INTERFACE which can be enabled in settings. For checklists that have an associated X-Plane dataref (or set of datarefs and test conditions) present in their .clist file, AirEFB queries these datarefs in X-Plane and marks the item as complete if the test passes. In other words, with this feature enabled, and *if* the checklist has the corresponding dataref in its original clist file, if you set the parking break on the plane the item "Parking Brake SET" turns green automatically as is marked as done without you having to tap on it. |
6. DOCUMENTS
There isn't much to say about this EFB page other than it essentally allows users to keep a collection of PDF files (with presumably relevant flight documents such as plane technical operations manuals) in a single plane and a hierarchical file structure. They are accessed and viewed the same way CHARTS are.
Unlike charts however, there are no cloud documents, so in order to populate this page the user will need to create a folder named DOCUMENTS with multiple PDF files and sub-folders, and drag it to AirEFB using iTunes File Sharing.
7. AIRPORT DATA & MAP
This is definitely the most advanced piece of AirEFB and quite possibly the most interesting one.
|
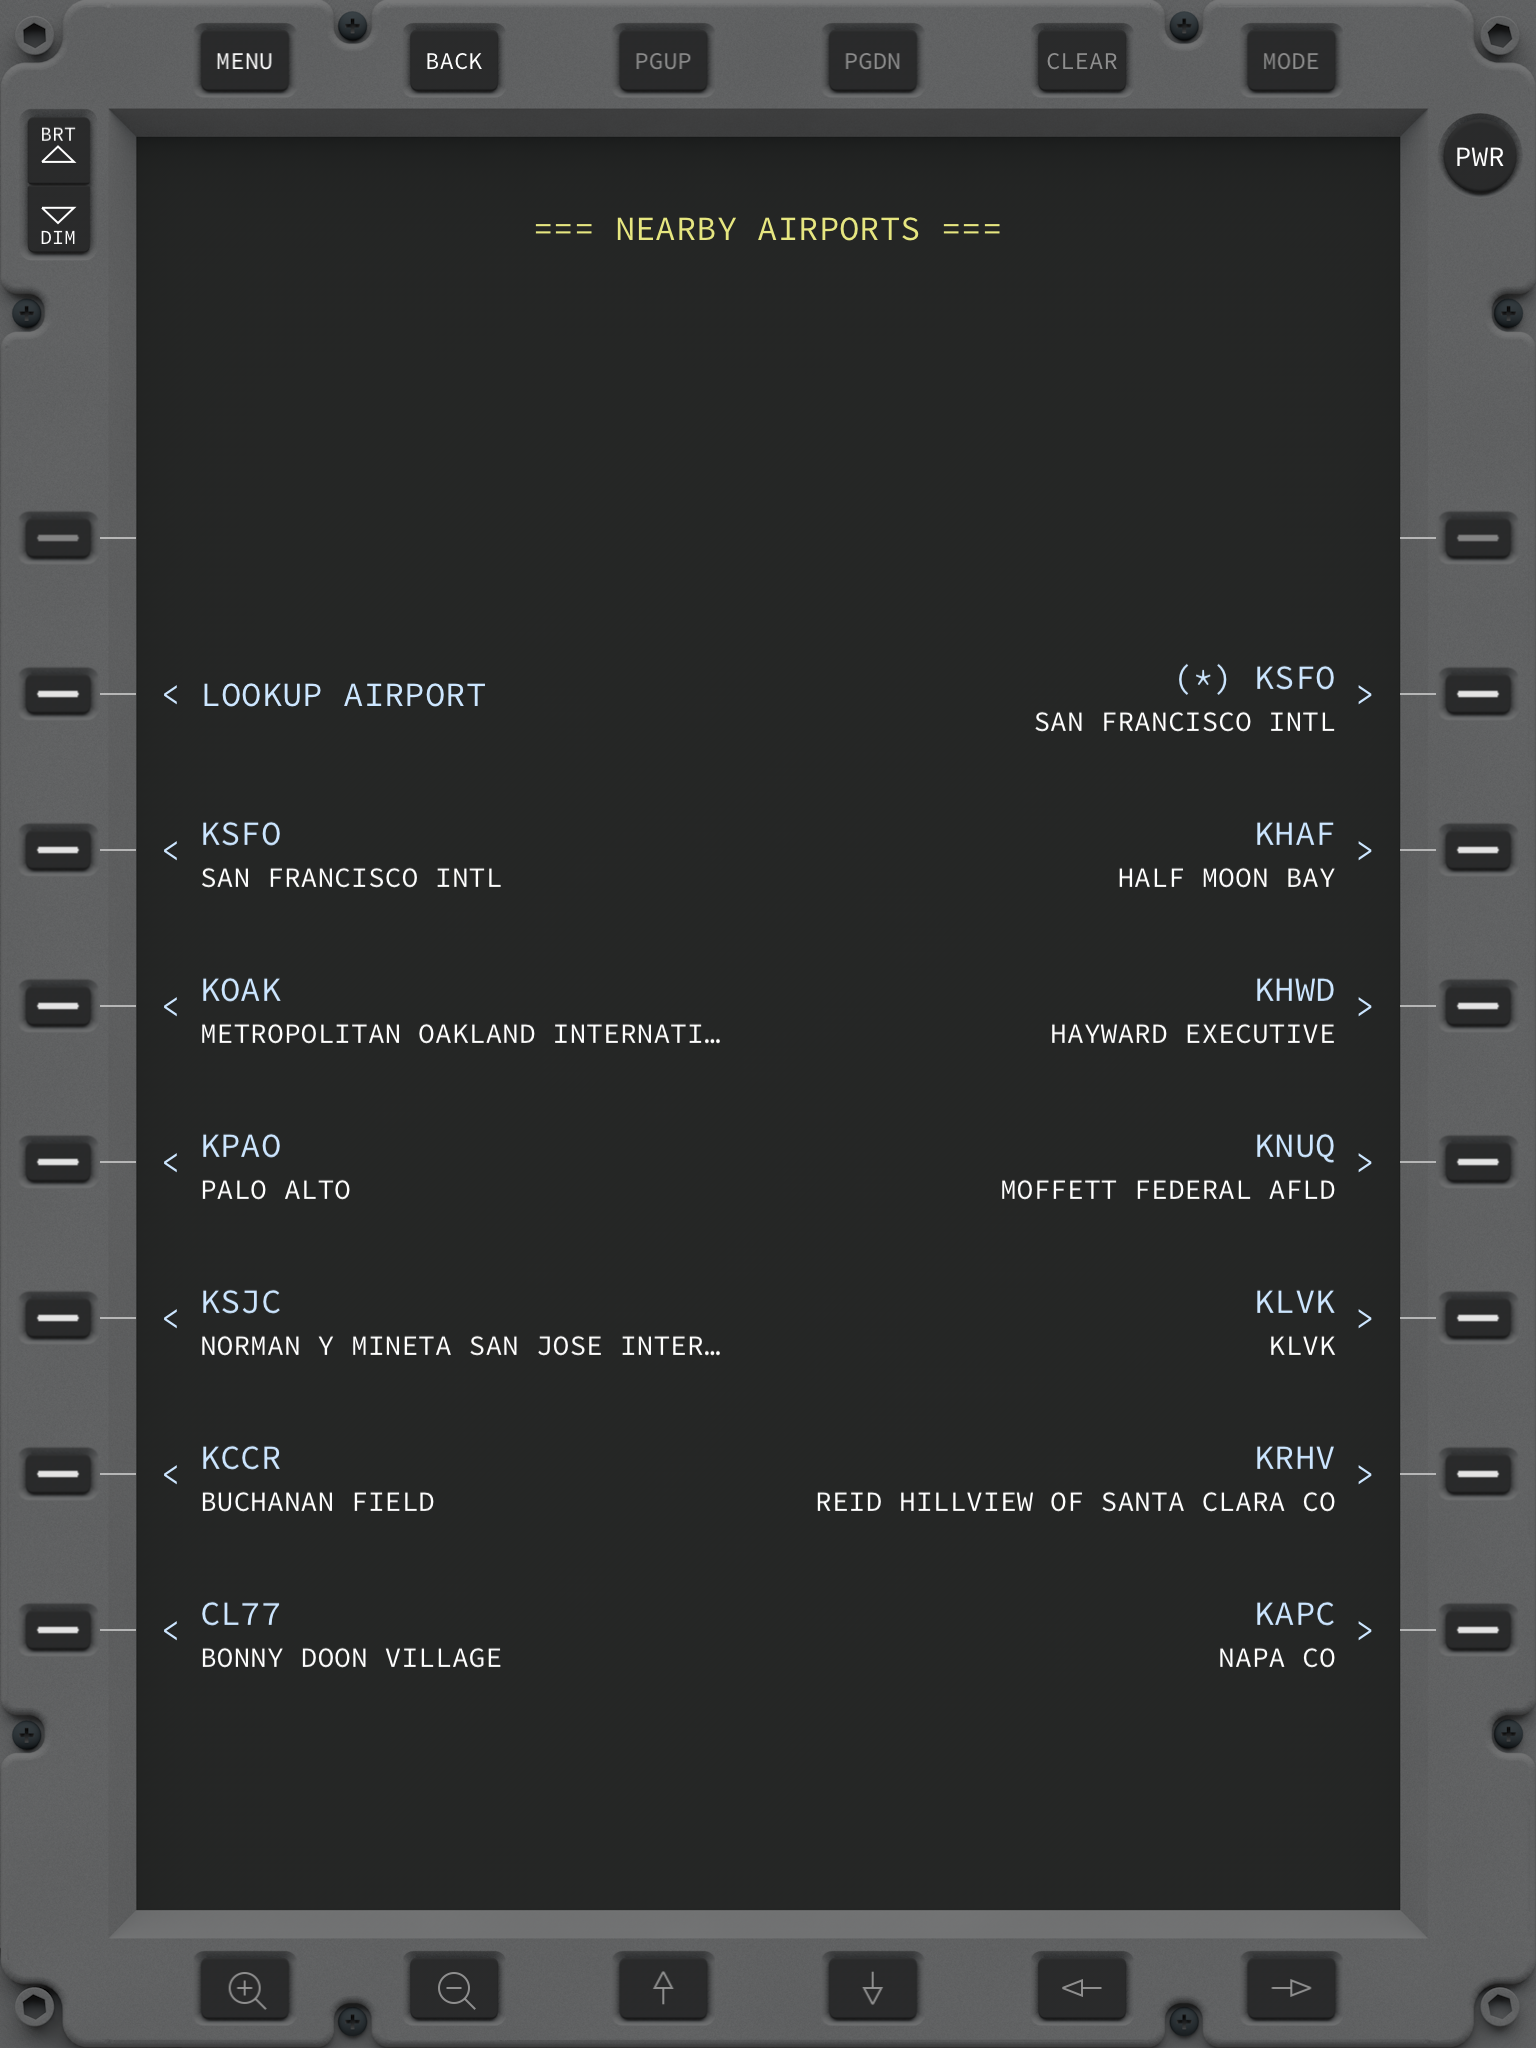
By default, AirEFB attempts to obtain one's coordinates, either from the flight simulator or from the device location services (GPS) and shows a list of airports nearby. Which coordinates data source to use (or which simulator) can be selected in the settings page. Alternatively, the user can lookup any specific airport by entering either its ICAO code, IATA code, airport name or city, which produces a new list of matching records. AirEFB comes with the same thousands of Global Airports that X-Plane comes with as is based on the same apt.dat file. Alternatively users can provide their own updated version of airports by simply copying an updated apt.dat file to AirEFB using iTunes file sharing. If the CUSTOM SCENERY AIRPORTS option is enabled in settings and there are custom airports in the Custom Scenery folder of the user's X-Plane installation, these airports are also beamed down to AirEFB and appear next to the default ones in the listing preceded by the (*) symbol. Looking at the picture on the left, KSFO is an example of this where the first (*) entry corresponds to a custom San Francisco airport found on the Custom Scenery folder and the second KSFO entry corresponds to the default X-Plane airport representation. Both can be accessed / viewed. |
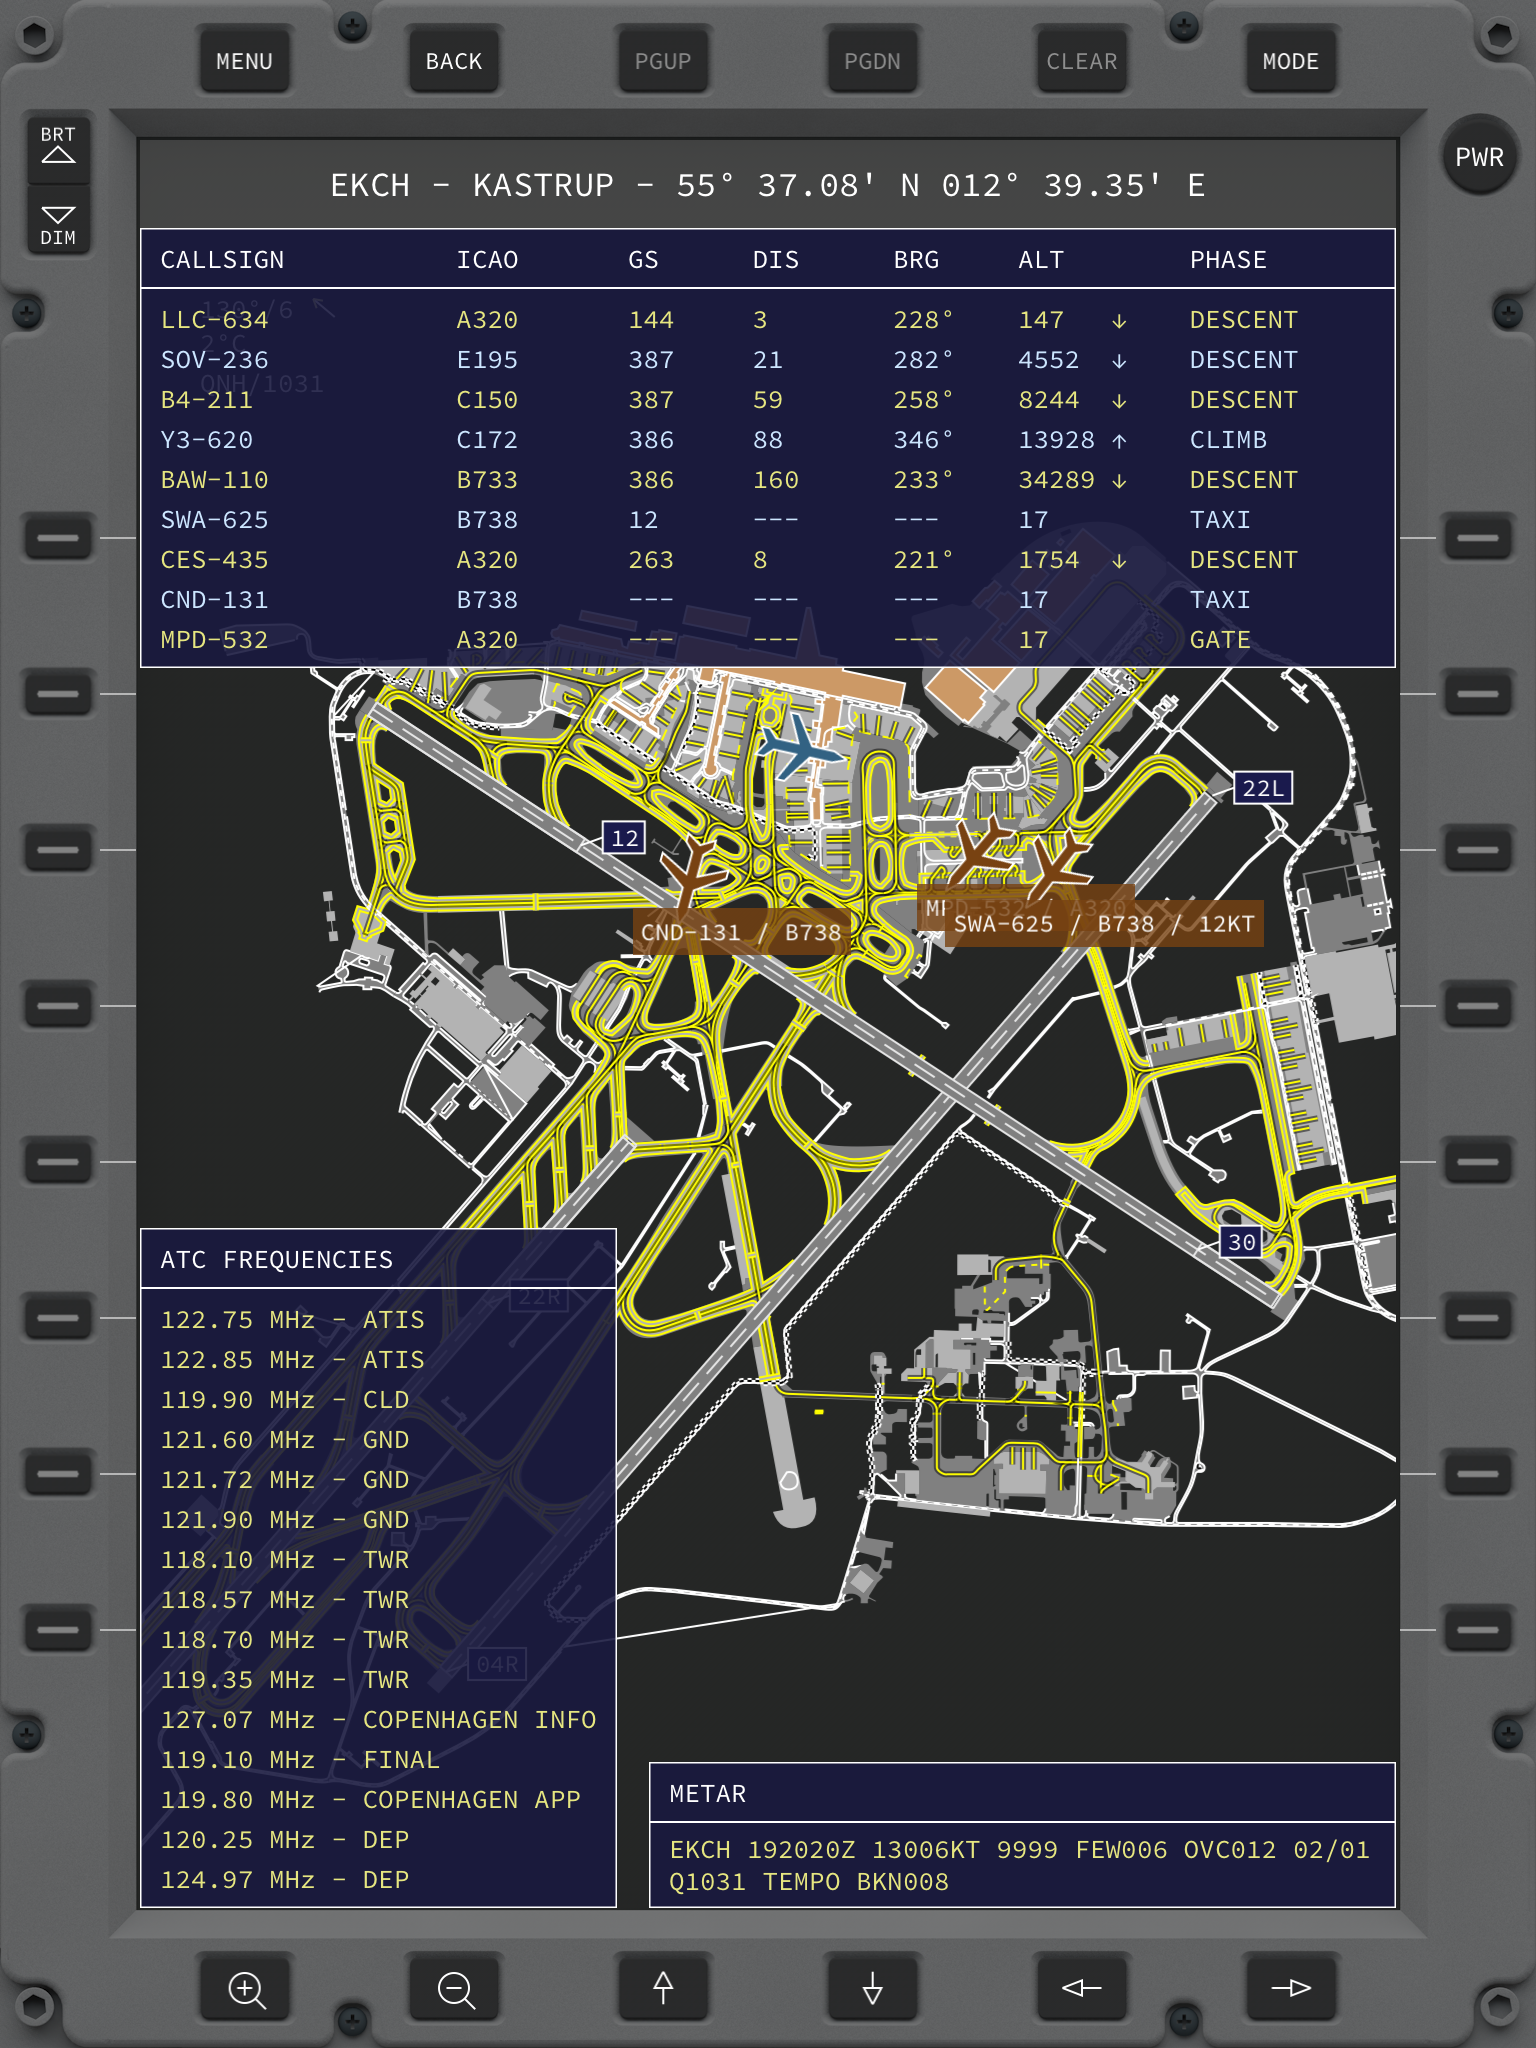
Selecting an airport loads its TAXI / ground map on screen as well as all its relevant data:
|
There is too much information on the example picture but things can be enabled and disabled using the MODE button. First and foremost there is the airport map with all its runways and taxiways. Using finger gestures (or corresponding buttons) the user can zoom in and out of different areas of the airport ground map. The BLUE plane represents your postion i.e. your plane coordinates and heading. Hence if you need to taxi to runway 30 for example, you'll need to move so that the blue plane goes close to the 30 (displayed in a dark blue box) holding point on the map. BROWN planes represent other planes currently in the simulator, from an ATC source. By default these are the X-Plane ATC planes, but if X-Life from JAR design is in use, these are the planes found in X-Life. Tapping on the planes discloses or hides their tag which comprises their callsign, ICAO model and speed if they're moving.Only planes on the ground are shown moving and they smoothly vanish once they become airborne. The blue board on the top shows all ATC planes including those still in the air, either on aproach or climb phase, together with their corresponding ground speed (in knots), distance from us (in nautical miles), bearing from us in degrees and altitude in feet. |
|
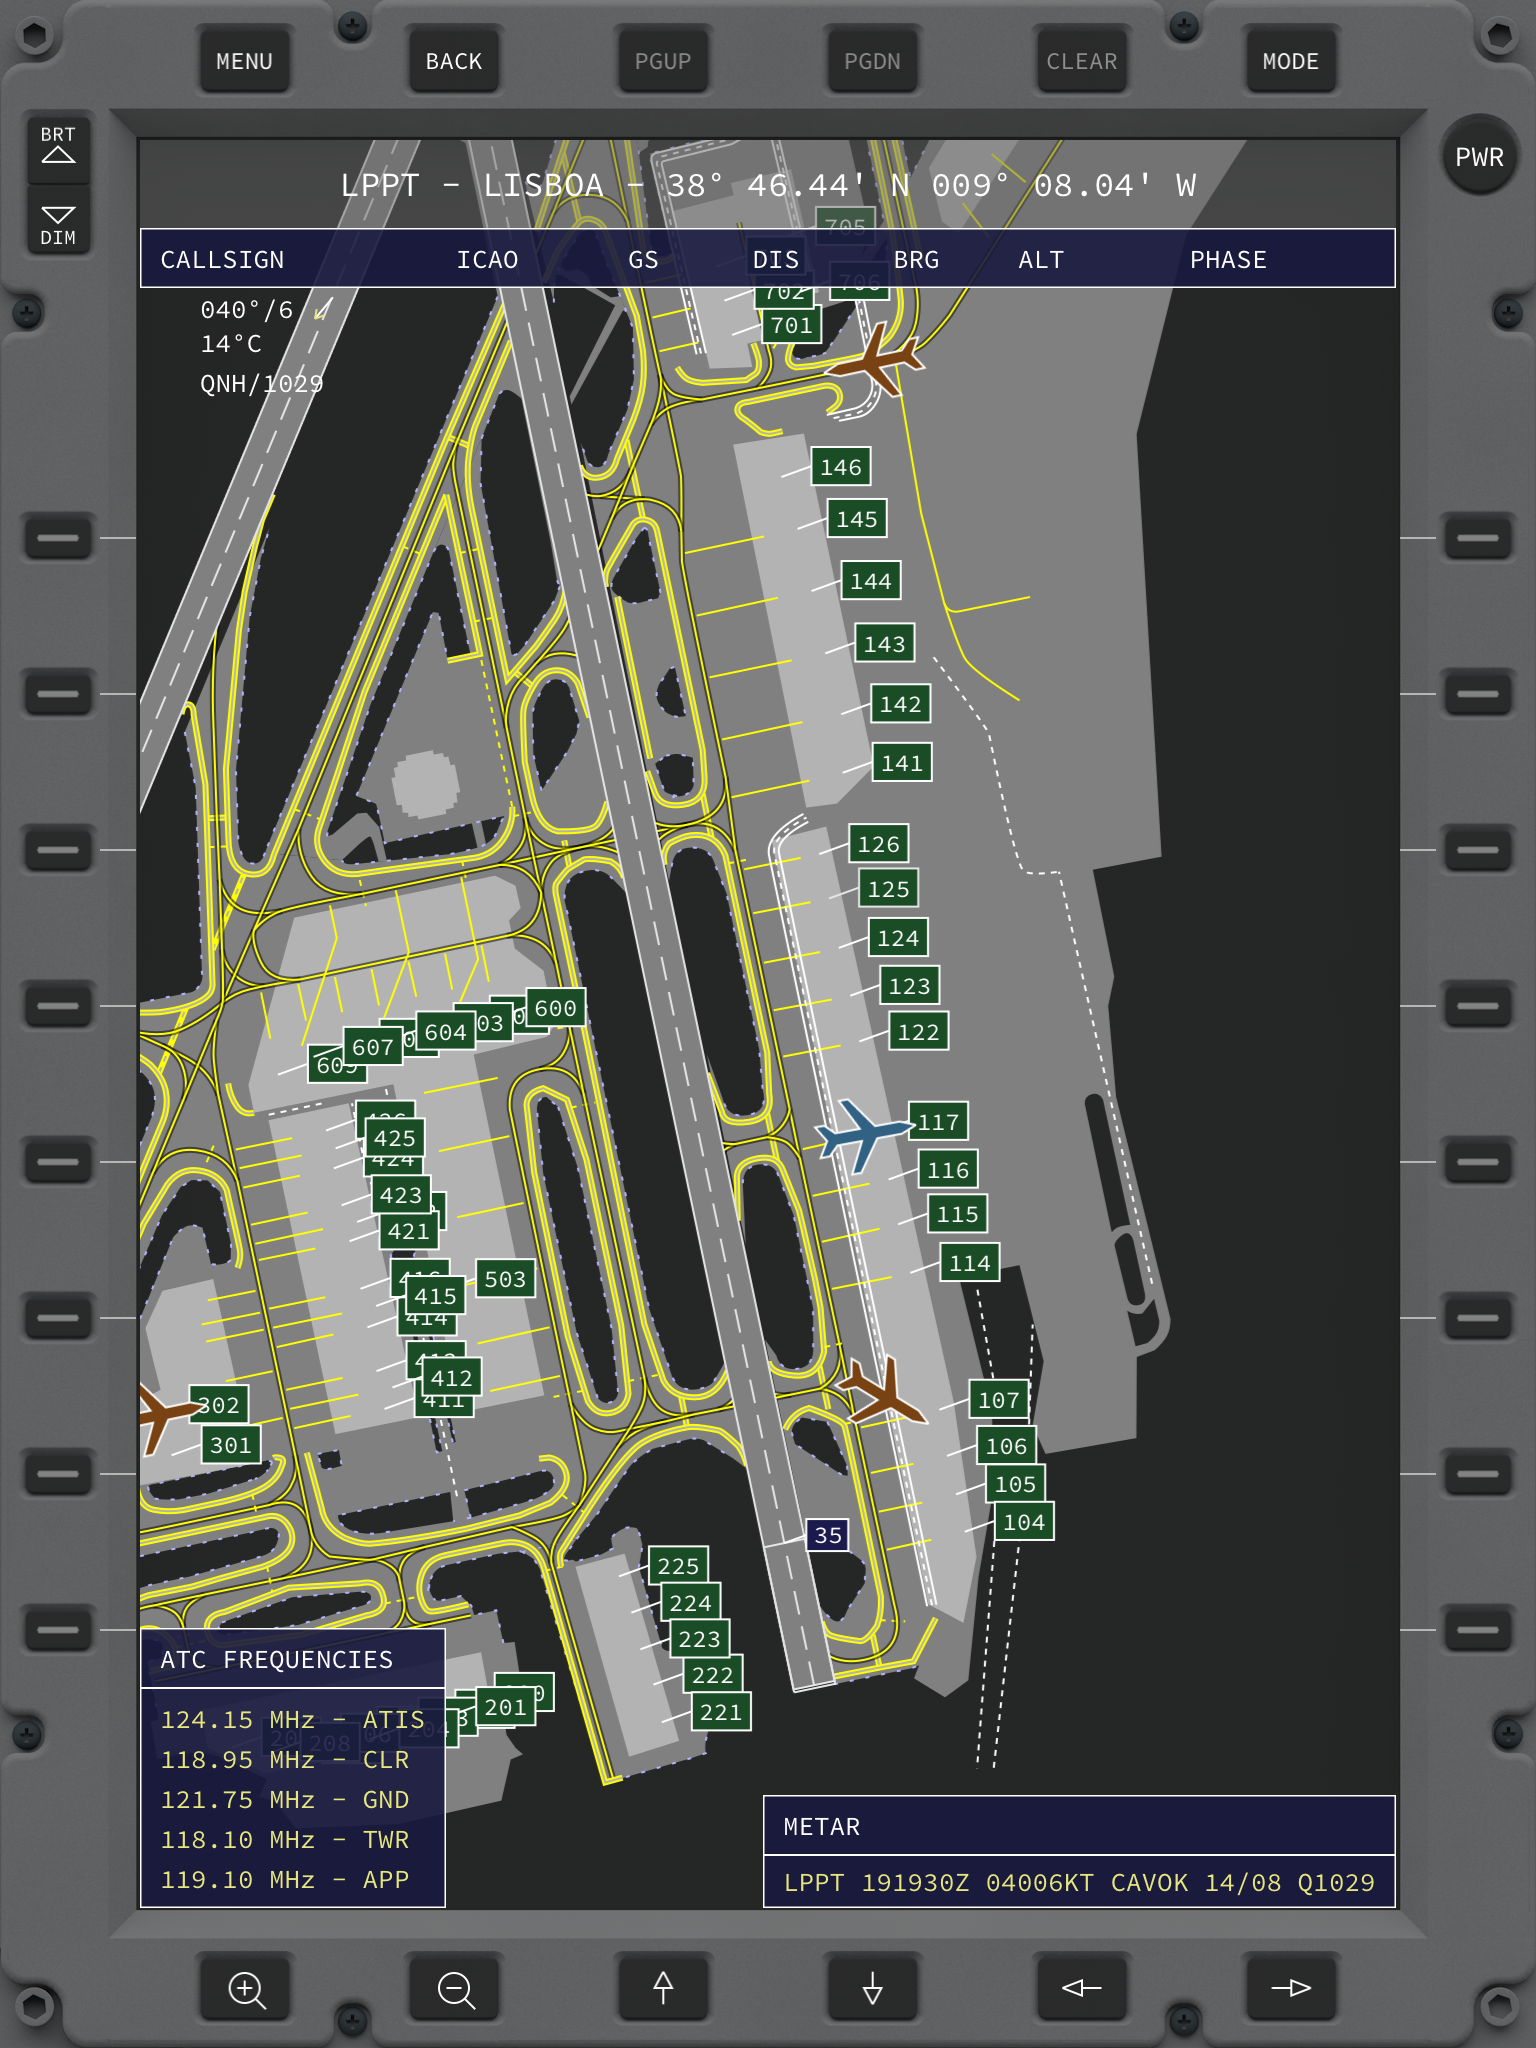
If enabled under MODE, the different gates and parking positions are also displayed in green boxes as shown in the picture on the left. The lower left blue box contains all the airport's ATC frequencies and positions as defined for the given airport. The lower right blue box contains the METAR for the airport, if one is available. This is the current real weather at that given airport as retrieved from the Internet. This information is periodically downloaded and always up to date. If weather information is available, on the top left corner of the screen is also the direction and speed of the wind, the current temperature and the air pressure / QNH / altimeter setting currently in effect at the selected airport. All blue boxes can be expanded and collapsed by clicking on them. Furthermore they can be individually disabled / hidden under the MODE settings. |
|
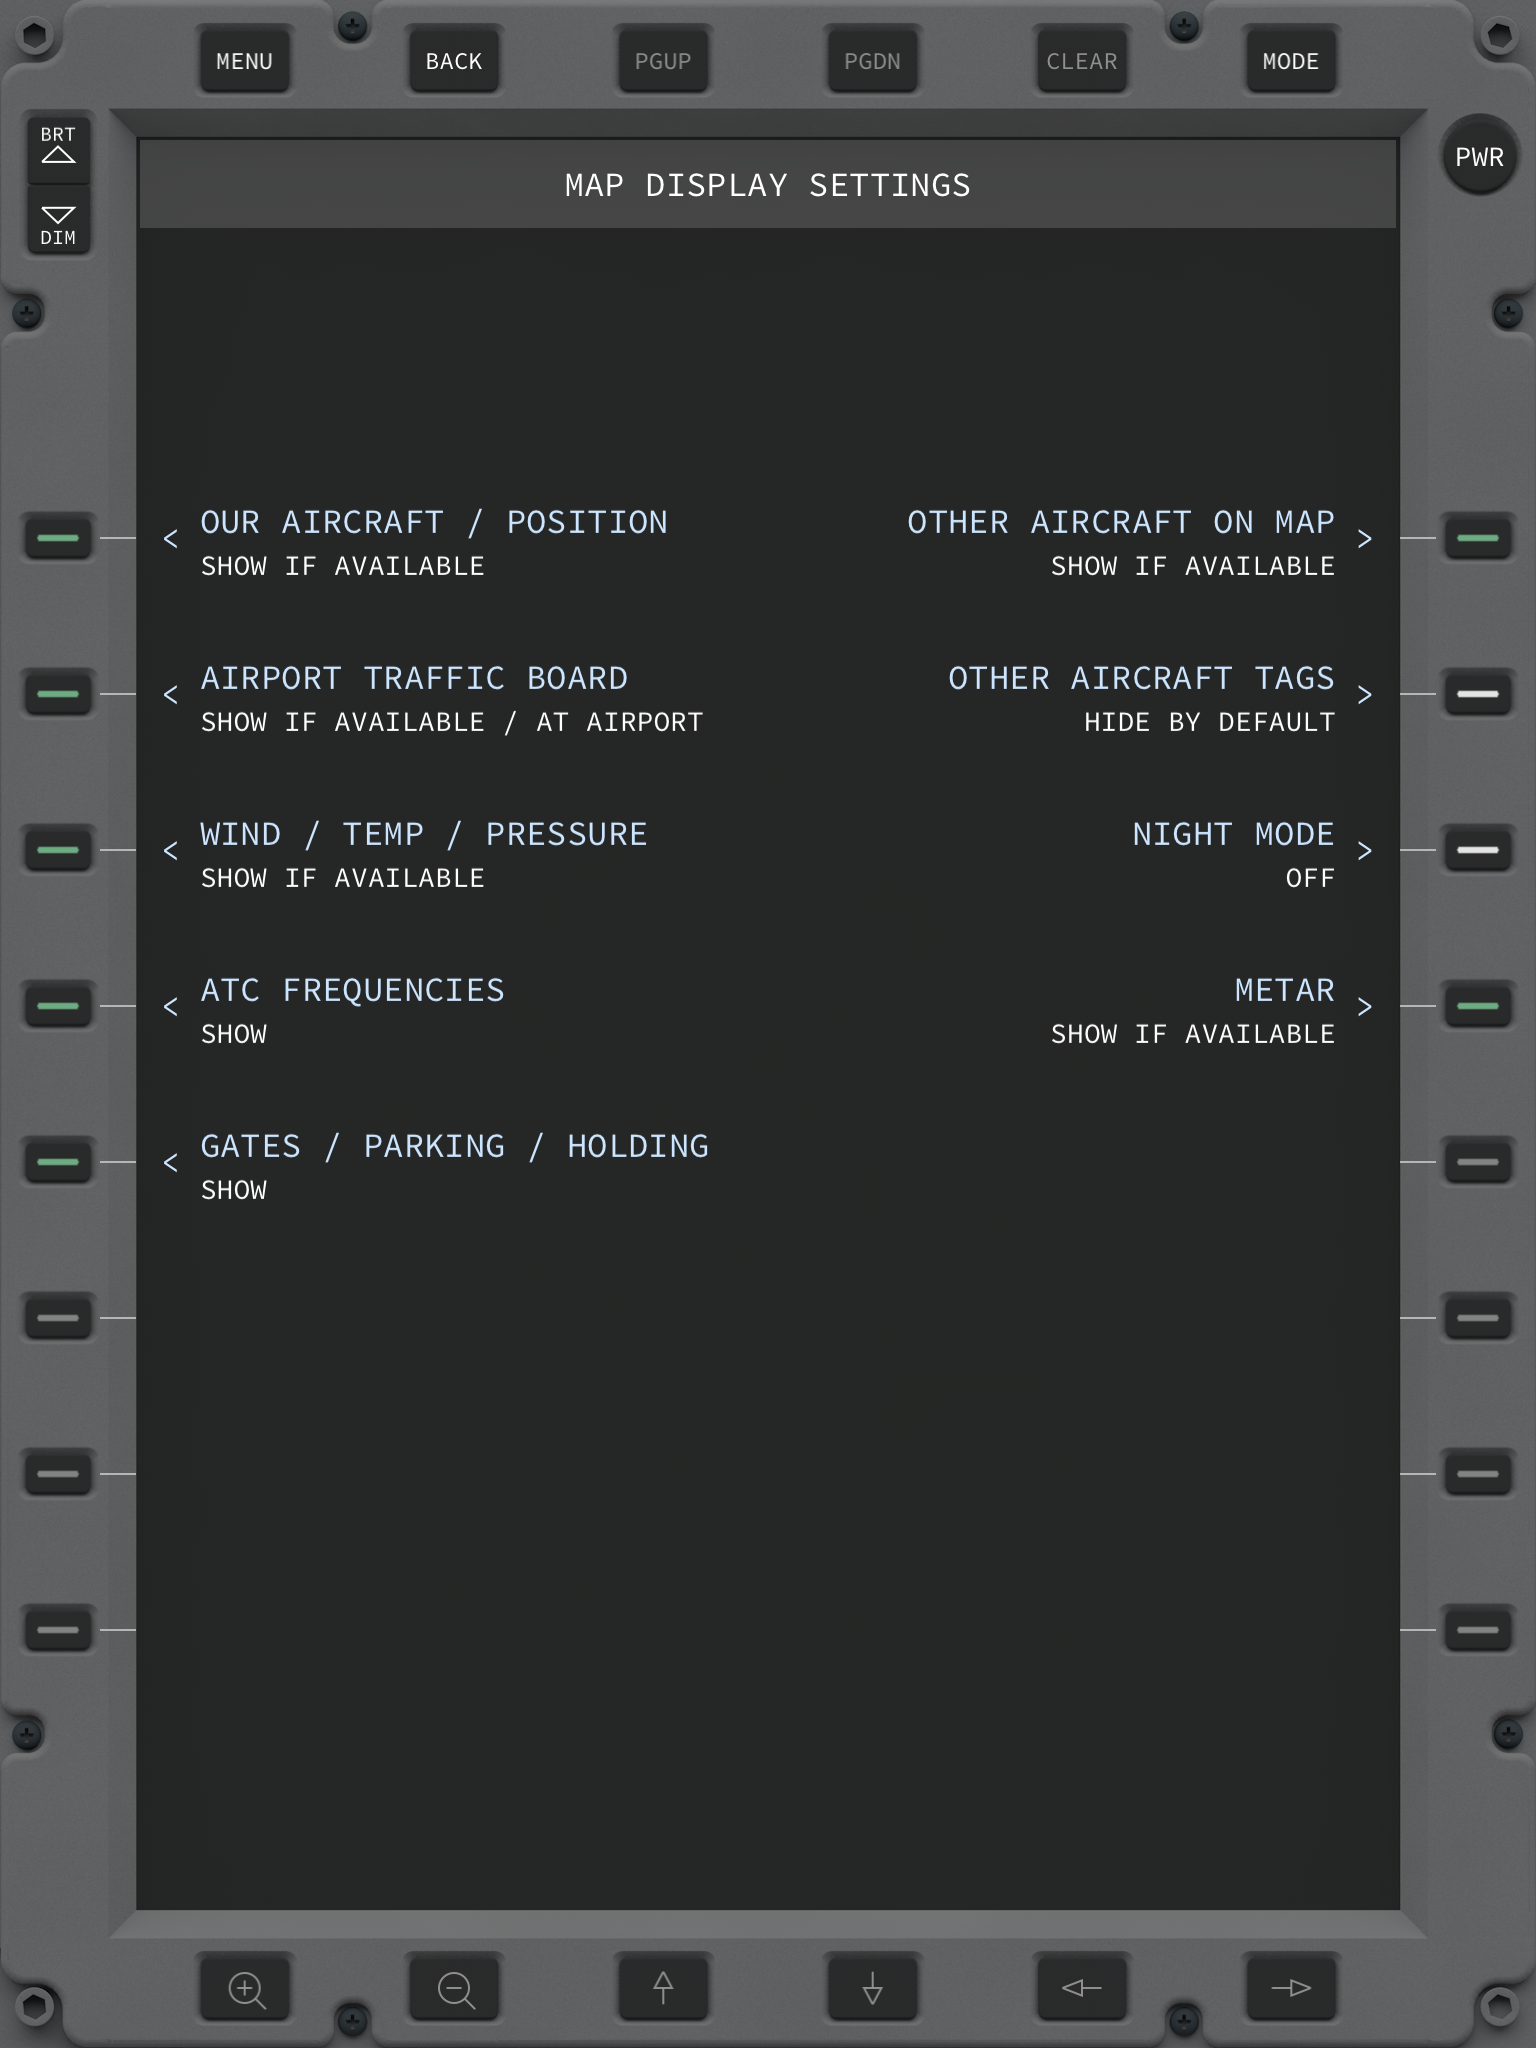
The picture on the side shows the MAP options configurable under MODE. OUR AIRCRAFT / POSITION causes the user's own plane to be shown on the map (or not). OTHER AIRCRAFT ON MAP the other ATC planes in brown. AIRCRAFT TRAFFIC BOARD the blue ATC board on the top. OTHER AIRCRAFT TAGS defines if ATC aircraft tags are all shown by default or hidden. Tapping on the individual planes causes their state to toggle. ATC FREQUENCIES shows or hides the frequencies blue box. METAR and WIND / TEMP / PRESSURE enable and disable the weather blue box and wind top-left indicators. And lastly, the GATES selector toggles the display of gates on green. Because there can be many gates that overlap each other when zoomed out, this setting is disabled by default. |
8. SETTINGS
The last EFB data page is the SETTINGS page and as the name suggests, allows various app settings to be defined.
|
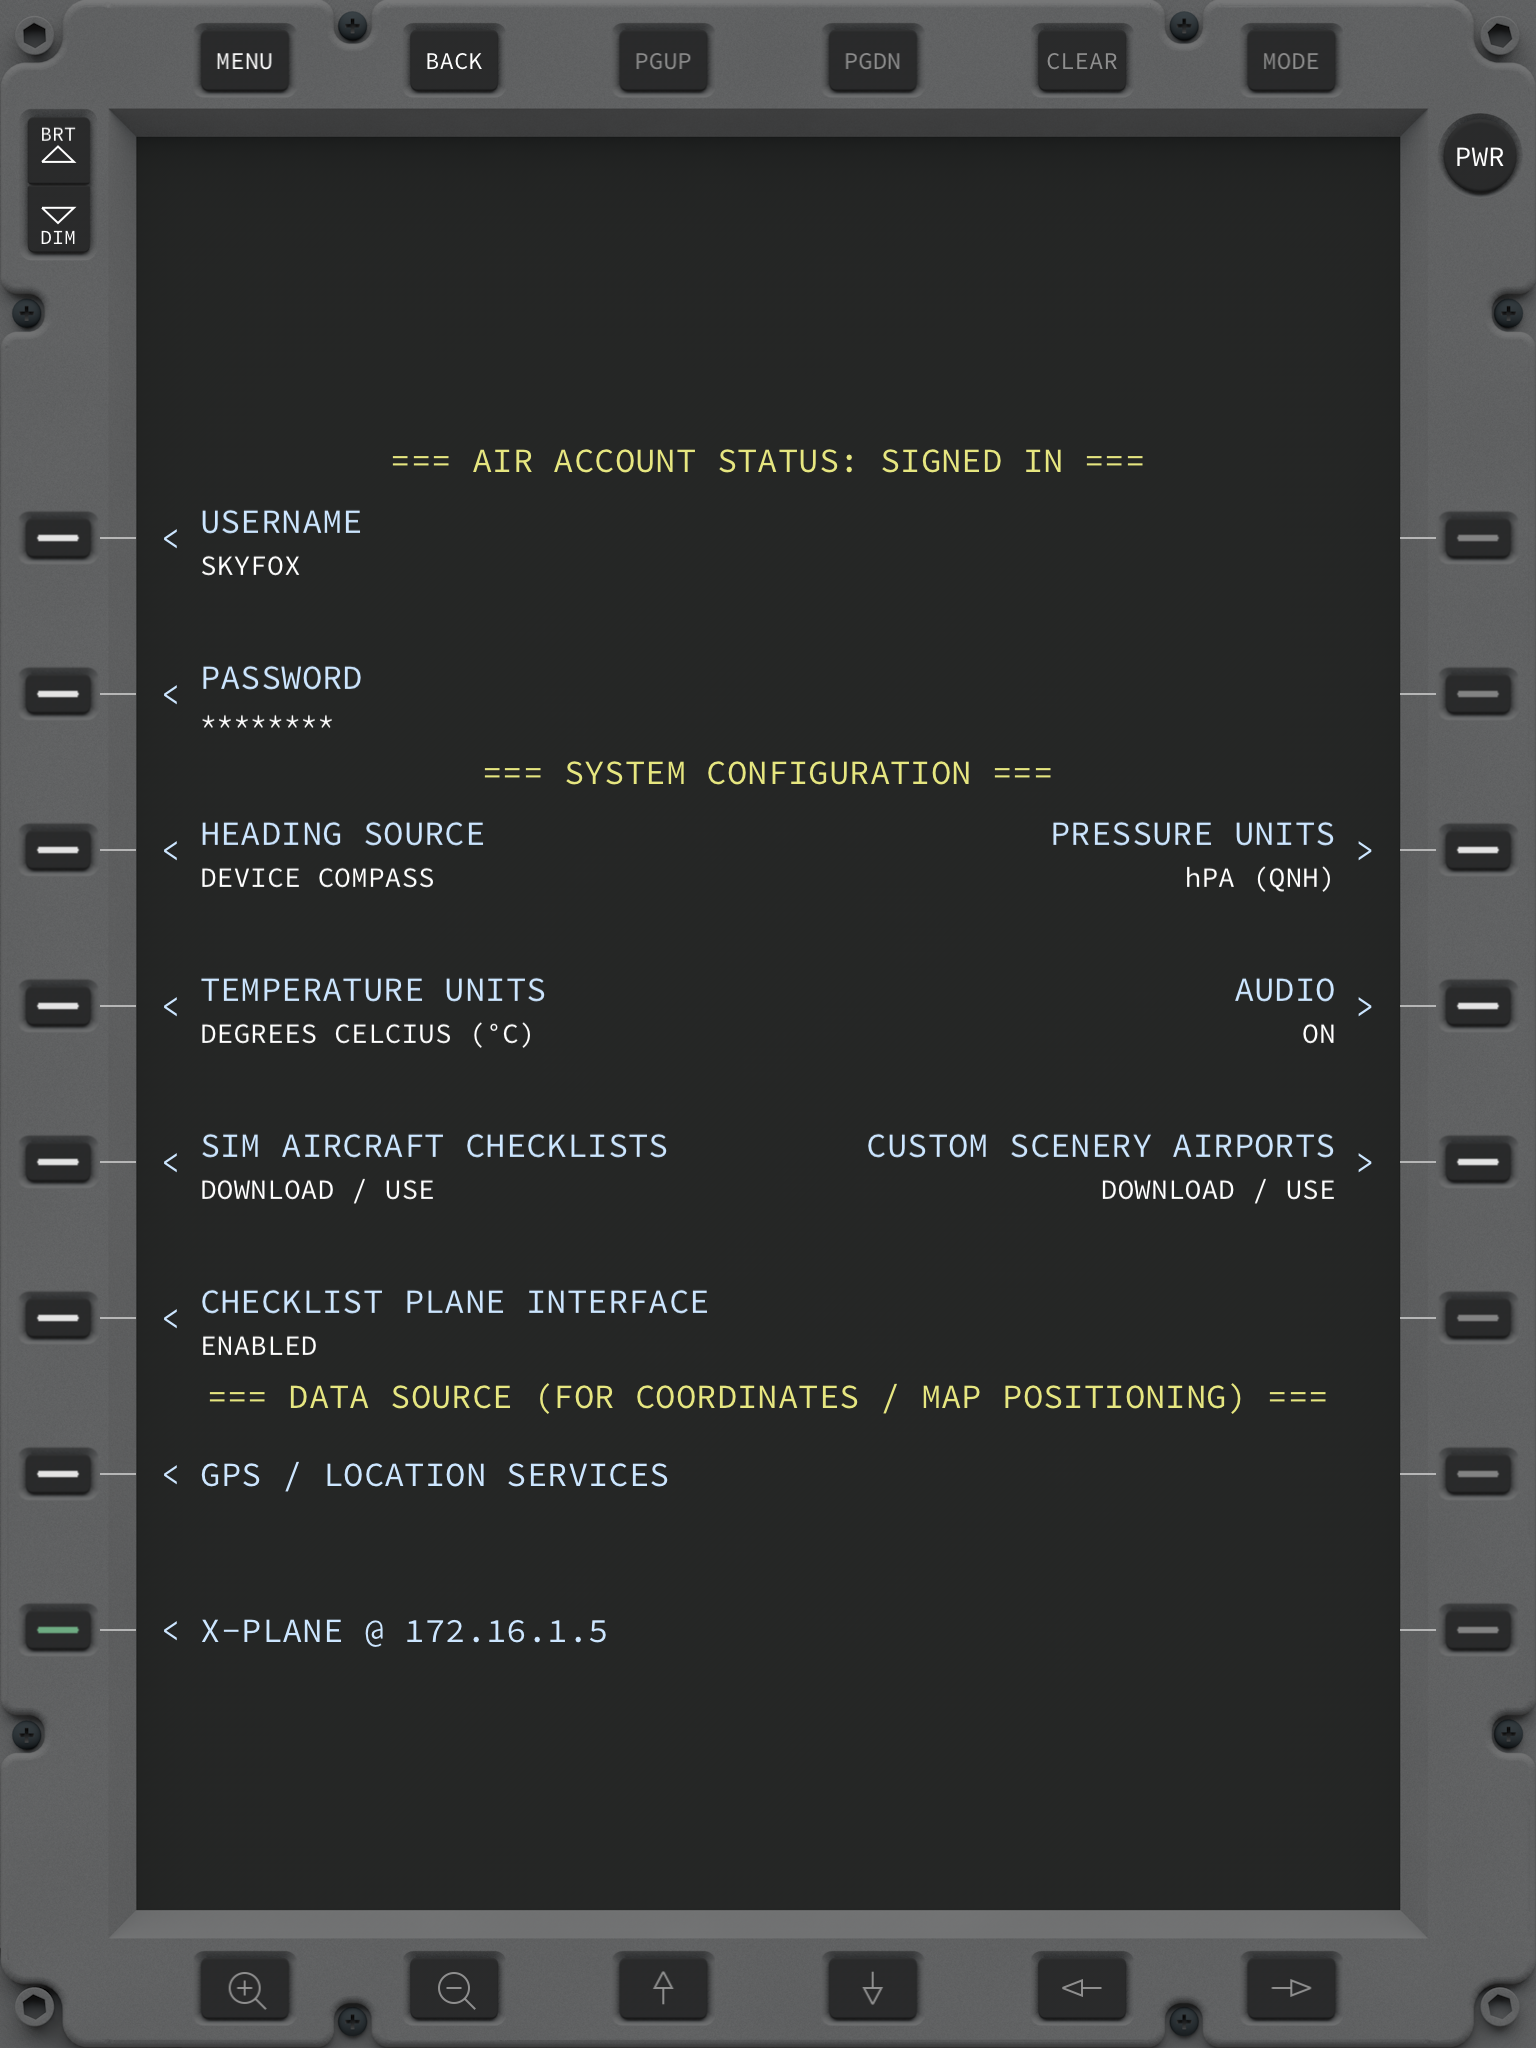
The AIR ACCOUNT section allows the user to enter their Air Account credentials. There are used to provide access to the user's own set of uploaded cloud charts when logged in. The same username and password that are used on the website should be entered. It is also possible to signup for a new account from this page. SYSTEM CONFIGURATION settings allow various things and units to be toggled and configured. Most are self explanatory or have been described in the checklists and airports section above. DATA SOURCES appear and disappear on demand as simulators are run and detected with the corresponding plugins. Only one datasource can be selected at any given time, providing the source for coordinates, but multiple instances of X-Plane can be running on different computers within the same network segment and be shown with their corresponding IP addresses. |
9. THE END
This operations manual ends here. This page is NOT intentionally left blank because this is a web page and it wouldn't make much sense :D Fun flights with AirEFB and don't hesitate to contact support if you have any questions, problems or suggestions.
Next topic: Credits