The PFDAirTrack's PFD or Primary Flight Display currently replicates the one found on Boeing 737 NG family of planes. For reference, consider the PFD picture on this page.
Speed TapeThe bar on the left represents your current indicated air speed in knots. If you have selected km/h or mi/h in settings a second value will display above with the speed in these units. On the Device Sensors (GPS) datasource the IAS is equal to your ground speed. Below the bar is the speed displayed in mach or GS. If your data source has auto-pilot the number above the bar represents the dialed air speed.
Vertical Speed PointerThe bar on the right represents the vertical speed and its needle moves up or down depending on whether you are climbing or descending. The number just below is the vertical speed in feet per minute.
Altitude TapeThe right bar just next to vertical speed is the altitude bar. The number in the centre is the altitude in feet. If metres are selected as units, a second box will appear above with these. Under it is the currently configured altimeter or QNH setting and on top the auto-pilot dialed altitude, if available.
Flight Mode AnnunciatorsThe boxes on top represent different flight mode statuses as extracted from the simulator and according to the auto-pilot and MCP settings.
Attitude IndicatorRight in the centre is the attitude indicator with information concerning the horizon, roll and pitch.
ILS / VOR GuidanceBy tuning an ILS or VOR frequency in NAV1, NAV2, and by intercepting it within its range, vertical and lateral deviation bugs will be displayed right and below the attitude indicator, aiding a precision approach.
CompassFinally on the bottom (or on the right side, depending on the orientation) is the compass with your heading. If auto-pilot is available the magenta number will also display the MCP dialed heading.
AI CalibrationWhen using the Device Sensors data source a CAL button appears in the PFD screen; pressing this button calibrates the attitude indicator to 0/0 at the current device's position. |
EFIS ButtonsThe AirTrack PFD comes with a set of EFIS buttons which are based on part of the EFIS panel found on Boeing 737 NG planes. They allow controlling things such as the altimeter/qnh, decision height variables and selecting metres display. AirTrack comes with 3 distinct PFD/EFIS types, representing the captain/left side PFD/EFIS of the plane, the first officer/right side PFD/EFIS set, and a third which contains standalone EFIS settings so multiple panels can be spawn each with its set of parameters. 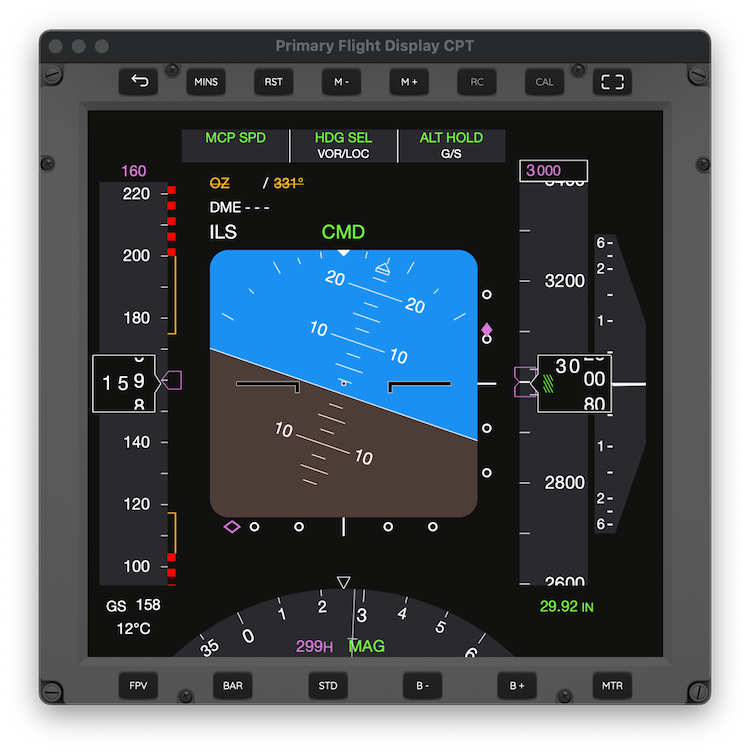
RC - Remote ControlRC or remote control mode is available as a button on PFD screens of simulator data sources. You can engage it by clicking on it once and disengage it by clicking again. When engaged, RC mode converts your device into a remote joystick / yoke with which you can control the aircraft. One second after being selected it auto-calibrates at the device's current position. From then on, lift the iPhone or iPad to raise or lower the nose of the plane and move it sideways to roll. If your device has a built-in gyro such as the one that can be found on the iPhone and iPod 4's, rotating it horizontally will also control the rudder. When finished, just deselect RC and move your device freely. Usage Notes: 1) When in RC mode the device acts as a remote joystick so it conflicts with any existing devices. This means that if you pull the joystick left and the phone right they will counter-cancel each other.2) Likewise if you try to control the plane simultaneously from distinct AirTrack instances. 3) For proper use of this feature you should have the device's screen orientation locked. Next topic: The Navigation Display |